About managing access to GitHub Copilot Business in your organization
GitHub Copilot Business is a GitHub Copilot subscription, billed and administered at the organization level. Organization owners can administer access for teams and individuals within the organization. Organization owners can also access usage data relating to GitHub Copilot Business in their organization, and use that data to make informed decisions about seat assignment.
Organization owners can also manage policies for GitHub Copilot Business. For more information, see "Managing policies for Copilot Business in your organization."
Configuring access to GitHub Copilot in your organization
Once you have set up your Copilot Business subscription, you can manage your organization members' access to GitHub Copilot.
Enabling access to GitHub Copilot for all current and future users in your organization
-
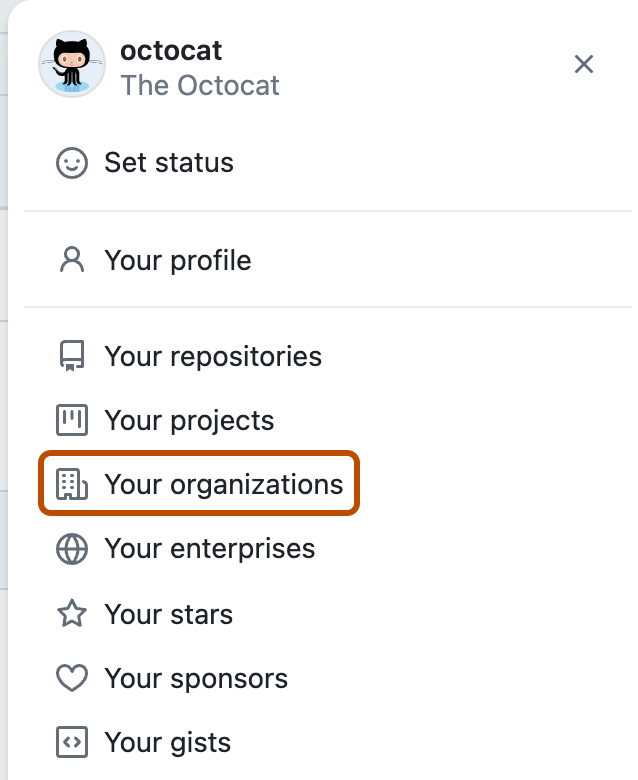
在 GitHub.com 的右上角,选择个人资料照片,然后单击 “你的组织”****。

-
在组织旁边,单击“设置”。
-
在边栏的“代码、规划和自动化”部分中,按下“ Copilot”,然后按下“访问权限”。********
-
Under "Copilot in your organization," to enable GitHub Copilot for all current and future users in your organization, select Enabled For: All members of the organization.
-
In the "Confirm seat assignment" dialog, to confirm that you want to enable GitHub Copilot for all current and future users in your organization, click Confirm.
-
To save your changes, click Save.
Enabling access to GitHub Copilot for specific users in your organization
-
在 GitHub.com 的右上角,选择个人资料照片,然后单击 “你的组织”****。

-
在组织旁边,单击“设置”。
-
在边栏的“代码、规划和自动化”部分中,按下“ Copilot”,然后按下“访问权限”。********
-
Under "Copilot in your organization," to enable GitHub Copilot for selected teams or users in your organization, select Enabled For: Selected members.
-
If you are updating user access from the Enabled For: All members of the organization setting, in the "Confirm seat assignment" dialog, select how you want to start assigning access.
- To unassign all members and then select those who should have access, select Start from scratch.
- To keep all members who currently have access and then select those who should not have access, select Keep all users.
-
If you selected Start from scratch, click Add seats.
-
If you selected Add seats, in the "Enable GitHub Copilot access to users and teams" dialog, you can either search for and add individual users or teams, or you can click Upload CSV to add members in bulk by uploading a CSV file.

-
To search for users, type their username or full name in the search bar. If you select a user who is not currently a member of your organization, they will be invited to join your organization when you click Continue to purchase followed by Purchase seats.
-
To add members in bulk, click Upload CSV, and then upload a CSV file including either the username or email address for each member you want to add, separated by a comma. The file can contain a mixture of usernames and email addresses.
Warning: When you upload a CSV file, GitHub Copilot will search all users on GitHub.com for matches. If the CSV includes users who are not members of your organization, they will be invited to join your organization when you click Continue to purchase followed by Purchase seats.
-
Review the list of users generated from your CSV file. To confirm that you want to grant access to the listed users, click Continue to purchase followed by Purchase seats. To reject the list, click Cancel.
-
-
If you selected Keep all users, review the full list of your organization members and select the individuals whose GitHub Copilot you want to revoke.
-
To confirm the revocation of access for the selected members, at the top of the list of members, click Cancel seat.
Revoking access to GitHub Copilot for your whole organization
-
在 GitHub.com 的右上角,选择个人资料照片,然后单击 “你的组织”****。

-
在组织旁边,单击“设置”。
-
在边栏的“代码规划和自动化”部分中,单击“ Copilot”,然后单击“访问权限” 。
-
在“组织中的 Copilot”下,要撤销组织中所有用户的 GitHub Copilot,选择“禁用”。****
-
在“确认删除席位”对话框中,按下“删除席位”。****
Revoking access to GitHub Copilot for specific users in your organization
Removing a user from the organization(s) that had assigned them a GitHub Copilot seat will automatically unassign the seat from them. Alternatively, you can unassign a member's GitHub Copilot seat, while preserving their membership. These changes will take effect from the beginning of the next billing cycle.
-
在 GitHub.com 的右上角,选择个人资料照片,然后单击 “你的组织”****。

-
在组织旁边,单击“设置”。
-
在边栏的“代码、规划和自动化”部分中,按下“ Copilot”,然后按下“访问权限”。********
-
Under "Copilot in your organization," select Enabled For: selected members.
- In the "Confirm seat assignment" dialog, click Keep all users.
-
Under "Access for users and teams," in the search bar, type the member's username or full name.
-
To remove the member from the list of users who have access to GitHub Copilot, select the checkbox to the left of their username, then click Cancel seat.
-
In the "Confirm seat removal" dialog, click Remove seats.
Reviewing usage data for GitHub Copilot Business in your organization
You can review usage data for GitHub Copilot Business in your organization to help you make informed decisions about seat assignment.
-
在 GitHub.com 的右上角,选择个人资料照片,然后单击 “你的组织”****。

-
在组织旁边,单击“设置”。
-
在边栏的“代码、规划和自动化”部分中,按下“ Copilot”,然后按下“访问权限”。********
-
At the top of the page, under "GitHub Copilot," you can see an overview of your organization's GitHub Copilot usage. You can see the number seats assigned through your Copilot Business subscription, and the estimated monthly cost.

-
For more detailed information, next to "Access for users and teams," click Get report.
- GitHub will generate a report for you, which you can download as a CSV file.
-
Alternatively, under "Access for users and teams," you can use the Sort options to sort the list of users by when they last used GitHub Copilot.