Enabling secret scanning alerts for users
You can enable secret scanning alerts for users for any free public repository that you own. Once enabled, secret scanning scans for any secrets in your entire Git history on all branches present in your GitHub repository. Secret scanning also searches issue descriptions and comments for secrets.
You can also enable secret scanning for multiple repositories in an organization at the same time. For more information, see "Securing your organization."
-
On GitHub.com, navigate to the main page of the repository.
-
Under your repository name, click Settings. If you cannot see the "Settings" tab, select the dropdown menu, then click Settings.

-
In the "Security" section of the sidebar, click Code security and analysis.
-
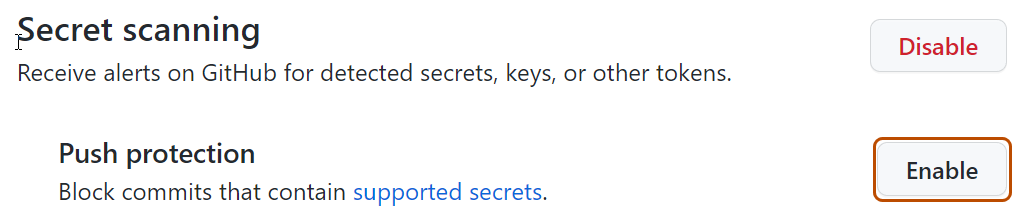
Scroll down to the bottom of the page, and click Enable for secret scanning. If you see a Disable button, it means that secret scanning is already enabled for the repository.

-
Optionally, if you want to enable push protection, click Enable to the right of "Push protection." When you enable push protection for your organization or repository, secret scanning also checks pushes for high-confidence secrets (those identified with a low false positive rate). Secret scanning lists any secrets it detects so the author can review the secrets and remove them or, if needed, allow those secrets to be pushed. For more information, see "Push protection for repositories and organizations."


Enabling secret scanning alerts for users for all your public repositories
You can enable secret scanning alerts for users for all of your public repositories through your personal account settings.
-
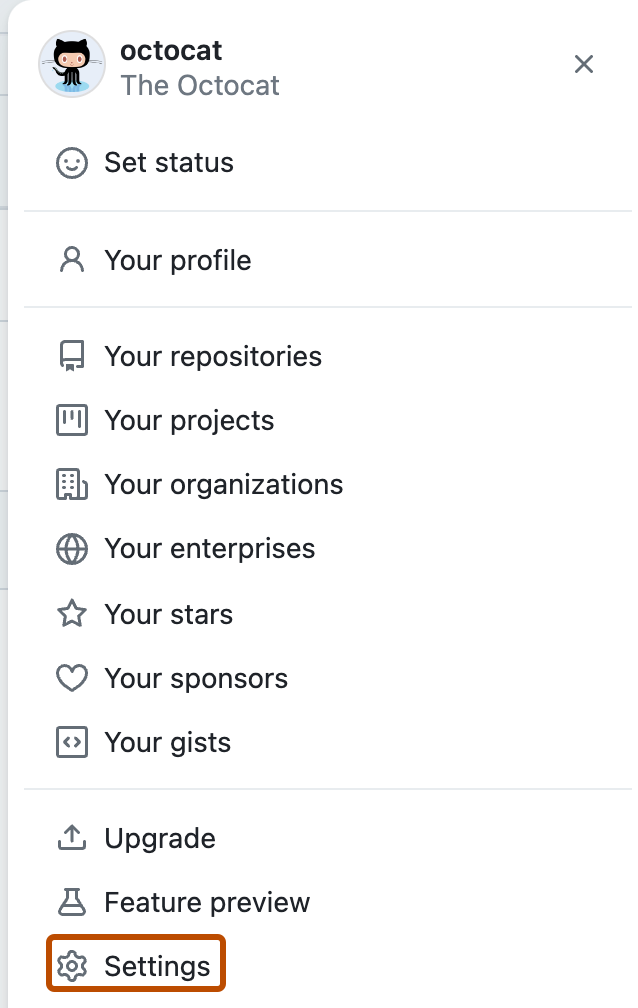
In the upper-right corner of any page, click your profile photo, then click Settings.
-
In the "Security" section of the sidebar, click Code security and analysis.
-
Under "Code security and analysis", to the right of "Secret scanning", click Disable all or Enable all.

-
Optionally, to automatically enable secret scanning for any new public repositories that you create, below "Secret scanning", select the checkbox for "Automatically enable for new public repositories."


Excluding directories from secret scanning alerts for users
You can configure a secret_scanning.yml file to exclude directories from secret scanning, including when you use push protection. For example, you can exclude directories that contain tests or randomly generated content.
-
On GitHub.com, navigate to the main page of the repository.
-
Above the list of files, select the Add file dropdown menu, then click Create new file.
Alternatively, you can click in the file tree view on the left.

-
In the file name field, type .github/secret_scanning.yml.
-
Under Edit new file, type
paths-ignore:followed by the paths you want to exclude from secret scanning.paths-ignore: - "foo/bar/*.js"You can use special characters, such as
*to filter paths. For more information about filter patterns, see "Workflow syntax for GitHub Actions."Notes:
- If there are more than 1,000 entries in
paths-ignore, secret scanning will only exclude the first 1,000 directories from scans. - If
secret_scanning.ymlis larger than 1 MB, secret scanning will ignore the entire file.
- If there are more than 1,000 entries in

You can also ignore individual alerts from secret scanning. For more information, see "Managing alerts from secret scanning."